Showing posts with label sewing. Show all posts
Wednesday, August 8, 2012
After three days of tearing up the sheets...
... I have sheet yarn!! Hee!
I have sore wrists, string everywhere, and a confused husband, but it's done. Four (very old) king sized sheets, thanks to my mother's linen closet, are now in strips to make a new crafty creation!
FYI, tearing sheets into strips is oddly therapeutic.
I don't want to ruin the surprise of what I'm making with this wonderful stuff, but it's going to be neat!
Any guesses on what I'm making? :) :) :)
Thursday, June 7, 2012
Inspiration Station
So after a wonderful weekend with the mother-in-law (who was kind enough to buy us a shiny, new air conditioner!!!!) and my sister, and my other sister's baby shower (new baby!!!!!) .... I am exhausted.
At least my sunburn is from actual sunshine this time.
I haven't had much crafty creative time, but I sure found some great ideas to try! So I am going to annoy you with commentary on each idea. :)
I have been working on this post for two days and I keep getting sidetracked. The internet had too many arty crafty fun blogs and ideas! My brain wants to implode!
So welcome to Inspiration Station... I'll be your tour guide through some happy fun today!
First up, we have a fun kiddo craft that is happening at my house as soon as the Idaho weather decides to cooperate. Key words there are "Idaho weather" so it could be August. It's Bubble Prints!
Side note: this is hands down one of the best kid art blogs I have ever seen. The blog is run by a K-6 art teacher and there are HUNDREDS of ideas. If you need something to do with your kiddo, go here. I spent an hour looking around and still didn't get bored. I want to try about 15 other things with Lily including a summer memory quilt idea that was inspired by this blog.
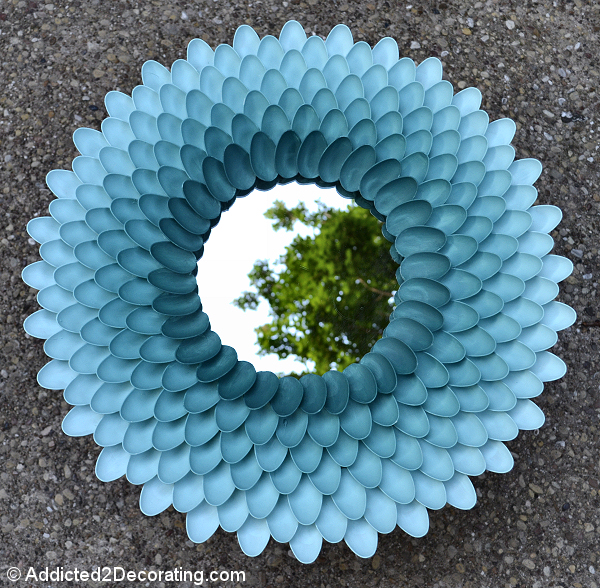
Next up, we have pure genius. If you are on pinterest, chances are you've seen this, but it is so amazing that I have to share it. Addicted 2 Decorating has made this amazing mirror out of.... SPOONS!
I love everything about this. It's from spoons. It has a gorgeous color fade. It's pretty. I have seen other spoon mirrors out there, but this one takes the cake. It is full of win and I can only hope some nice family member will take my children for a day sometime in the future so I can make this. It would look awesome in yellow or maybe purple.
Moving on... is an adorable headband from Love Stitched. I actually made a bracelet using this knot the other day, but I want to do a headband for each of us three girls in the house. It took five minutes to learn the knot. Plus, t-shirt recycling, always a favorite of mine.
If you're more attached to your glue gun than your sewing machine, this is a crafty must do for you! I think I personally would sew the ends together, but that's just cause I want to use my sewing machine as often as I can get my sticky, grubby mom hands on it. I love the two-tone bands she has done as well.
And finally, for the knock-off win of the century, Besserina takes home the gold. I fell in LOVE with the Georgina duvet cover from Anthropologie. I tried for several months to figure out how to afford a duvet that was worth as much as several months rent. I still have the picture of it. This is the original:
Isn't it stunning? Gah! Love love love it. Well, Besserina has a wonderful tutorial on how to make my own. It might take me a few years to get all the flowers done, but I am DOING this some day. She does her's for a toddler bed size...so very adorable.
It may say something about me, but I think a good knock off is even better than the original. It takes some pretty fine talent to create something from a picture and make it as good (or better) than the original. I love this in white, but it would last about 2.5 seconds at my house before getting stained, so I would have to make it colorful.
Well, this was super fun, so I'll have to do it again. Hope you find some time to get lost in Blog land and find some lovely adventures to undertake!
Labels:
blog,
inspiration,
inspire,
kid craftiness,
pinterest,
random,
sewing
Tuesday, May 8, 2012
Tutorial Tryout: Onesie dress with a matching hair bow!
Woo hoo! Look what I made!
So I fell in love with these adorable onesie dresses the first time I saw them. I didn't think they would be too hard to make, but there are SO MANY tutorials out there. I found a few I liked and decided to take the plunge. Unfortunately it's a tent still on lil miss Sagey poo because it's a 6 month onesie, but it was laundry day when I started this project and a 6 month size onesie was the only size I could find. Also, it's my first attempt at applique and I'm hooked.
I relied mainly on the skirted onesie tutorial from Running With Scissors because I liked that it kept the bum of the onesie intact. I hate diapers showing and didn't want to take the time to make a diaper cover. While I was cutting out my fabric I decided to try a bow tutorial as well. It's so much cuter when hair bows and outfits are perfectly matched, right? The bow tutorial was SUPER easy and from Momtastic.
I had some adorable paisley fabric and this onesie. The dream on the front was cute, but so light it was hard to read, so I kind of wanted to cover it up. I cut a heart out of the fabric, sewed it on, and used the handy applique stitch on my sewing machine. It didn't quite cover all the green, but for a first shot, I am super impressed with myself. We'll see how it holds together after Sage wears it a time or two.
I tried to add the sleeves as in the tutorial, but they were too small and I was too lazy to cut and sew new ones. When you are cheating on your baby with your sewing machine, time is limited. As it was, this took two days to get done in between mom chores.
I think I have finally succumbed to the hair bow/flower making craze. I have made a few here and there, but the fabric bows and flowers are stinkin' adorable and quick enough that I can actually get them done during nap time. Lily has already requested some. I told her she could pick out some pieces from my fabric stash and help me make them.
Anyway, there you have it! Sweetie pie dress with my first ever applique and a matching cutie bow. Now I have to make one in a size she can actually wear right now!
Monday, April 30, 2012
Tutorial Tryout: Crinkle Toy
Meet my new favorite baby shower gift ever. I am pretty proud of this little darling, seeing as it only took me about 20 minutes to put together and was made from bits and pieces about my house. I didn't get any other pictures of it before I gave it away as a shower gift, but it's composed of the following:
Orange and white butterfly fabric, from my scrap stash.
Pink Minky (on the back), also from my scrap stash.
Rainbow ribbon, rummaged from a bathroom drawer of hair accessories.
Purple ribbon, packaging from a set of baby blankets given to me as a gift that hadn't been used yet.
Cellophane. Here's where I had to get creative. I took the outside wrapper from a bag of microwave popcorn and used that.
Polyfill stuffing, about a handful. I wanted it squishy, but not too big for tiny hands to grab onto.
I searched around several tutorials for how to make this little beauty. I ended up using the tutorial I found on Simple Things, Sweet Life (sidenote: I love the gifts in a card section!). I didn't sew in my crinkle and I added that bit of poly, but the basics were the clearest on her tutorial. Also, her toy was adorable.
I adore giving handmade gifts and don't want to follow the common crowds by giving baby blankets, so this is a perfect idea. And considering how many babies are on the way in my world of friends and family, the adorable and easy factors of this toy cannot be denied. I've already sewn up a second one for baby Sage to play with. She likes to stuff it in her mouth.
With this second one, I added a zig zag edge. I also didn't add any polyfill. Just playing around, trying to find my own personal groove. (I really need to work on this picture thing.)
Have fun!
Labels:
baby,
handmade gifts,
sewing,
toy,
tutorial tryout
Subscribe to:
Posts (Atom)


