Showing posts with label diy. Show all posts

Thursday, October 17, 2013

PONY (pizza princess) PARTY: the final three

So, as I should have anticipated, the last three ponies were a mad dash rush. School seems to be pouring out homework and exams and papers and certification exams... so I was crocheting around all of that while trying to remember important things like bath time, dinner time, laundry time, and snuggle time. Being a mom is tough! Being a school attending mom of two who is working on her teaching certification and with a compulsion to crochet awesome gifts (and blog about it!) makes for one extremely busy schedule.  So, I'll apologize for my lack of blogging/FB updating/emailing lately. I also can't express how much your well wishes on FB as I was taking the ginormous tests for my teaching certification meant to me. You helped me pass! Really!

Now on to the moment I've been promising.... PONY PARTY EXTRAVAGANZA!

To read about Pony Party Part 1: Rainbow Dash, click here.
To read about Pony Party Part 2: Fluttershy, click here.
To read about Pony Party Part 3, AppleJack, click here.

Pony number four was Twilight Sparkle. This was no regular Twilight Sparkle, she had to be an alicorn. For you non-MLP people (is it alright if I come stay with you for awhile?) that means a pony who is both pegasus and unicorn. It's a big deal. There was much screaming and joy jumping at my house when Twilight Sparkle became an alicorn.


Cute, right? You can't see her wings very well in this picture, but I promise you, they were much appreciated by Lilster.

Pinkie Pie fought me. Every. step. of. the. way. First, the original colors of yarn were not quite right. Found and bought new yarn, didn't realize the weight was off. So Pinkie's a bit smaller than the others. She also looked like a deer without hair. Not even kidding a little bit. I had lost my camera right before I finished Twilight, so I couldn't take any pictures. At least I know I can crochet Bambi if need be.


Despite the Pinkie drama, she turned out to be so sweet and cuddly. Her hair is so much twirly fun!

I need to pause and set the stage here for a moment...Picture this....

It's the night before Lily's birthday party, which was actually the day before her birthday. Constant questions all day long had made their way out of my extremely excited daughter. The one that caused my heart to pound with anxiousness was, "Mom, can you give me your present at my party?" This meant that Pinkie and Rarity had to be completed in less than 24 hours. Less than 24 hours....

I stayed up really late, finished Pinkie, woke up, headed to the local cafe to sit and crochet Rarity.


If you look closely, you'll see Rarity is missing something. Can you tell what it is? Hmm?

If you guessed ears, you'd be right on the money. I was crocheting right up until 11:30 at which point I had to rush home, wrap without getting caught, and away we went to the museum/pizza/squeal-fest that was my daughter's birthday (more on that in another post!) and it wasn't until I was wrapping her that I started using words I don't allow my daughters to use as I realized Rarity was actually incomplete.

Oh well!


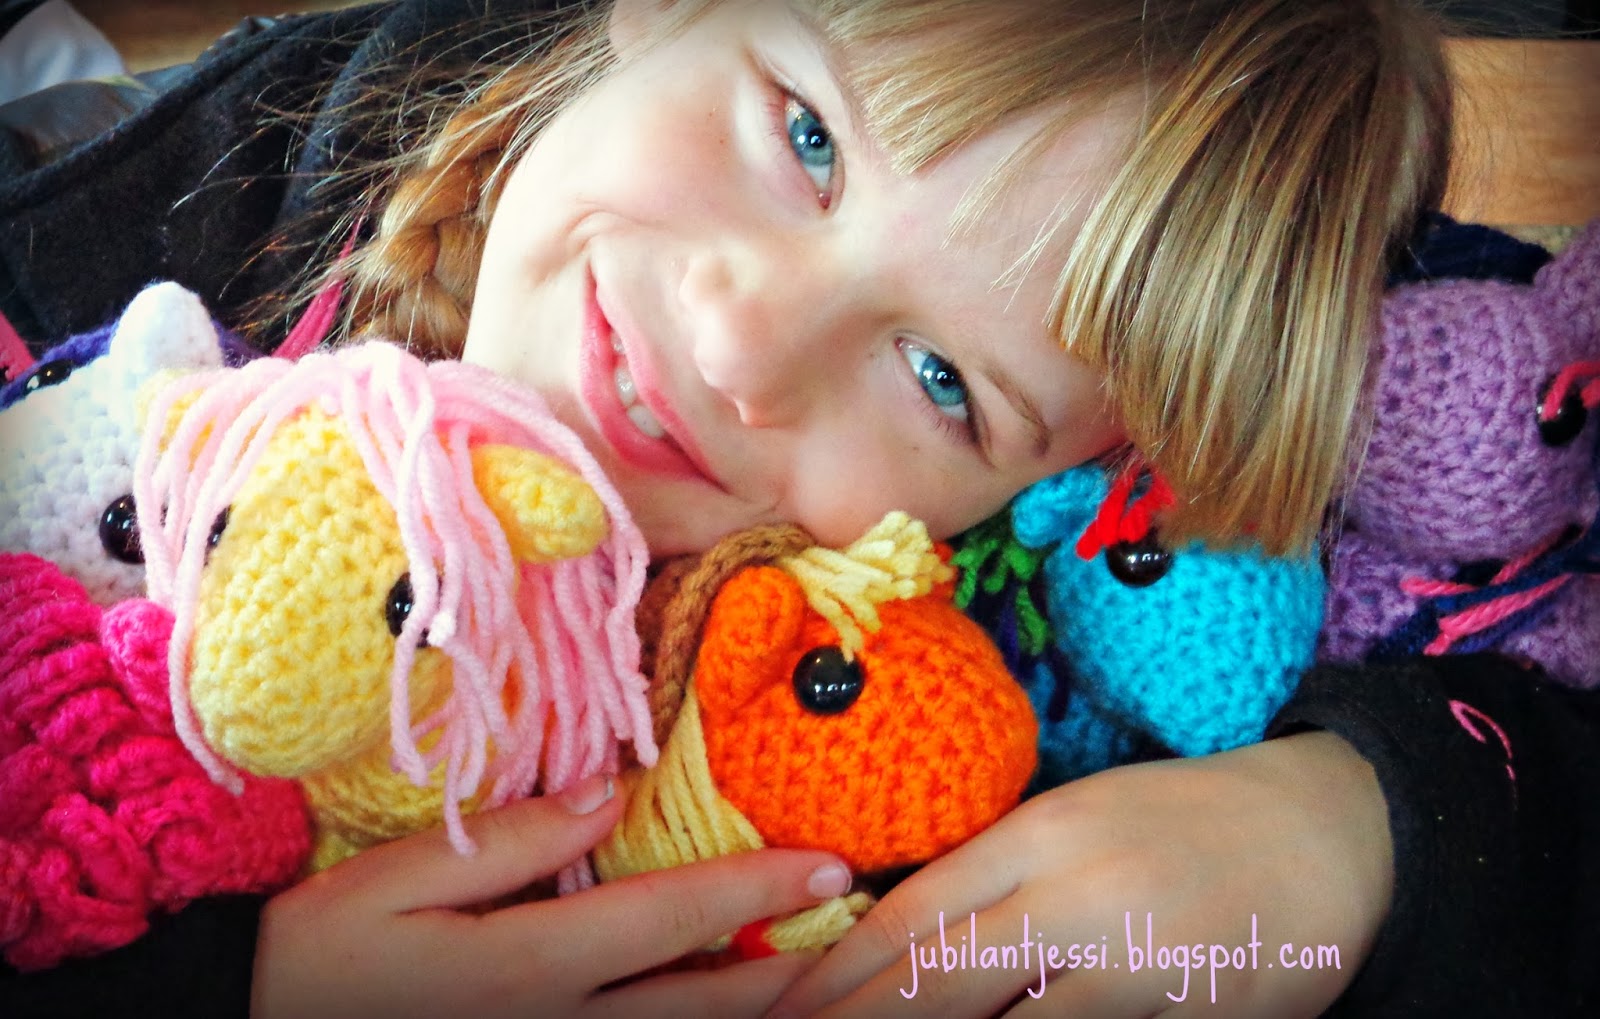
Lily L-O-V-E-D these. Best birthday present ever. She won't put them down. I have even had to stop her from taking them to school where they would be confiscated. She picks one each night to sleep with. She talks about how I need to make their cutie marks and their elements of friendship. Oh, and could I please, please please crochet Princess Celestia and Princess Luna and Dr. Whooves and Shining Armor and......


Long, long story short: I'm pretty much the best mom ever. I can drag out this gift forever as I am virtually unlimited in the number of ponies I could make. I'm also exhausted. :) 

Pattern info: visit acrylicsheep on Etsy or Ravelry for the pattern I used to make all of these delightful ponies!

I have linked this post to: Hooking on Hump Day and Craft Frenzy Friday!

Saturday, September 7, 2013

PONY PARTY Part 2: Fluttershy

To read PONY PARTY Part 1: Rainbow Dash, go here.

There ain't no party like a pony party..... 

I have about five million pictures of horses and ponies on my camera right now. There was a TON of horses at the fair. (I'll post my annual fair report in a day or two.) So the pony party has moved beyond crochet! On a semi-related note, I am pretty sure I could train a mini horse to be my next dog. I would never need to mow my back yard. I could take it on  walks and put it in sweet little outfits... ahhhhhhh. Dreams.


Aren't merry-go-rounds so pretty? I love the details and the slightly terrifying faces on the horses. They're not as cute as this week's pony for Lily's birthday project extravaganza though!!!

Here's Fluttershy!


She's so soft and the colors, though not my usual bright favorites, turned out fantastically. 


If you remember, I'm using the pattern from AcrylicSheep on etsy. She's got some great pony creations on her ravelry. I also found out that she has all the cutie mark patterns for FREE. I was really impressed because they were so simple. Time is of the essence with this project so I'll have to save all the cutie marks until the end. I just think the ponies look incomplete without them! That is also the kind of detail Lily will notice.

I was planning on finishing Pinkie after Rainbow Dash, but I got my hands on the yellow yarn first. I crocheted all the smaller pieces first and the head and body later. It made things go quickly. My biggest problem is convincing myself not to rush through. Two done, four go!


I still say Lily is going to be extremely spoiled, don't you agree?


I shared this post at Hooking on Hump Day!

Friday, July 19, 2013

Crochet Puppets are quite possibly the best thing ever.

Lily Bean

I had this great idea earlier in the summer. Crochet. Puppets. 
Despite my ever growing crochet skills, I hadn't quite made the brain jump to make this idea work out. I tried about five different times.
Too big. 
Too small.
Mouth is too weird. 
And so on. Picky, picky.
Finally, I figured it out. A big part of that was due to this wonderful pattern from Stitch 11. I searched for hours trying to find a pattern just like this one. So then I tried it and that huge help to me led to these adorable little friends!

PUPPETS!!!!

I kind of took the snake puppet idea and ran with it. These two puppets were for some of my friends of the shorter nature. A pair of 6 year old twins who were very particular when placing their orders. Twin #1 requested a blue and green puppet with an orange hat. Twin#2 requested a pink and purple puppet with yellow hair. I think I did pretty good. Aside from the basic idea of Stitch 11's pattern, the rest of the puppet such as the hat, eyes, hair and tongues were all my own. I even added eyelashes to the girl puppet! 

I wanted to also try playing around with crochet letters, and I had a lot of fun doing that part! 

crocheted letters of their first names... cute!

The first letter of their name on their puppets was the icing on the cake for the twins. I was so cool for doing that part. There are some great letter tutorials out there and pattern diagrams, if you are interested. Each letter took less than 5 minutes to make and look how personalized of a detail it is! 

Lily and Sage were my product testers. About thirty seconds in to testing, I got the approval. I had to immediately promise Lily that I would make her a girl puppet. And a dragon. And a fish, because Sage likes fish. 

Sage muffin

I have since started on Lily's list of puppets and I'll post more pictures of those later! I think these are my new favorite thing to crochet. I know, I know, I always say that. But look at these happy faces! There was no counting stitches, no worrying about perfection. These puppets are more charming because they aren't perfect. I think we all need a little less perfect in our life.


Now Lily is wanting a puppet show. She wants a stage and chairs and of course, an audience! So if you randomly get invited to a puppet show and the invitation is in crayon, you'll know where it came from! 

If you are interested in a pattern for the hat, eyes, hair, etc. please let me know. I can write those up if someone needs them! Also, for yarn buffs: I used Lily  Sugar and Creme 100% cotton yarn (you can guess why I picked this yarn I bet). These puppets can go on adventures and get wet and go in the wash. I wanted them played with after all! The colors I used were: Hot Blue, Hot Green, Grape, Hot Orange, Hot Pink, and Sunshine. Lot's of hotness up in here...

I loved making these and I am so proud of how they turned out! I just can't seem to stay away from making toys. Although, husbandy face even mentioned that he wants one of these puppets. HA!

If you use my puppet idea, please make sure to thank Stitch 11 for her pattern and also to link back here to my blog! I would love to see how you come up with some adornments and puppet friends! 

Sunday, January 13, 2013

Hooked on Granny.

After my month of a million scarves, you'd think I'd be sick of crochet. NOPE.

I am hopelessly addicted to yarn.

I have always wanted one of those hideously ugly and yet awesome afghans that I now know are called granny squares. I love the random rainbows of color.

I've started my very first granny blanket and I'm pretty proud of myself. I'm also tickled at the sheer amount of yarn I've collected for this project.


23 different colors of yarn in blues, purples, greens, blacks, greys, and white. I have sparkly, I have ugly, I have hand-me-down yarn. This baby is going to be sweet.

I have a LOT of work left to do. It's going to take me about a million years to finish sewing in ends that I didn't sew in as I went a long. Shame. Shame. Shame. If only school didn't start in two days, I bet I could have in done in a week or two. With homework already pouring in (grumble, grumble), I bet it gets done about the time summer hits. 


I really love the mish mash of colors, don't you? It's so ugly, it's gone right past ugly into beautiful.


Yay GRANNY!!!!

Wednesday, August 8, 2012

After three days of tearing up the sheets...


... I have sheet yarn!! Hee!

I have sore wrists, string everywhere, and a confused husband, but it's done. Four (very old) king sized sheets, thanks to my mother's linen closet, are now in strips to make a new crafty creation!

FYI, tearing sheets into strips is oddly therapeutic.

I don't want to ruin the surprise of what I'm making with this wonderful stuff, but it's going to be neat!

Any guesses on what I'm making? :) :) :)

Tuesday, August 7, 2012

To-Do Tuesday.

I just need to start asking for Home Depot / Joann's / Michaels's gift cards for all birthday, holiday, and special occasion gifts. I have way too many projects that I would love to try. Here's some of my current favorites: 

I am particularly fond of mushrooms. They're neat. I did a Biology experiment assignment where I grew my own mushrooms (oysters... delicious!) and have been oddly enamored ever since. Here's my latest mushroom love:

I found this photo here!
I have had a hard time finding out the original ideaster behind these adorable garden mushrooms, but they're stunning. They are also a perfect excuse for me to buy those pretty crystal dishes I always see at the thrift store. What a great way to create your own fairy garden!!

Over at Patina White, there is some really neat decorating using world globes.

I found this photo here!

Every self respecting teacher needs a globe and a good inspirational quote or two. This is a match made in heaven! I will have something like this in my someday classroom. Maybe when I get over my fear of power tools. 

I have also found a way to make use of the paint chip samples I can't stop myself from collecting. I've just about got the hubster convinced that our bedroom wall would look awesome like this:

I found this photo here!

I love rainbow anything. This seems like an amazing way to spruce up a wall that I can't paint. They used painters tape to adhere to the wall, so it would be easy enough to take down. I think this would be great in our ever changing rainbow bedroom. You can find more paint chip projects here.

As if I don't already have space issues in my house, I have been trying to figure out (since we moved in) how to fit a piano somewhere. I miss playing every day and I really want my girls to learn. Also, I want to try my hand at painting a piano.

I found this photo here!
Pinterest has so many wonderfully bright, happy pianos. When I finally get a bigger house or decide I don't need a living room couch... I'm getting my piano and it's going to be painted. No boring black in my house! :)

Moving back into the land of Realistic Crafty Projects, I am loving the rag rugs I am seeing lately. And kudos to the genius who had the idea of using jelly rolls or whatever you call them (packs of fabric strips for quilting) to save time on cutting. 

I found this photo here!
No one actually mentions how long it takes them to hand sew these babies together. Anyone know? I imagine it would be fairly simple to braid the strips. However, hand stitching and I don't get along so well. I have also seen some stunning rugs done with grocery bags or with (swoon) wool roving. I can't seem to find multicolored grocery bags though, and I don't have a bajillion dollars to spend on that much roving. I'll stick with fabric! :) I did find one tutorial that used a machine to stitch the rug together, so maybe there is hope for me yet.

Well, that's it for this week's to-do list. I may accomplish one of these projects in a year or two! HA! I need to take a vacation with my crafty supplies and my sewing machine. One weekend, no sleep, and no interruptions, I could get a whole pile of to-do items done! Of course, then I would complain about missing my babies and the husbandy face. Can't ever win!


Wednesday, August 1, 2012

More baby toys, because they're soft and squishy.

So, my world is full of babies lately! Yay babies!!

I have a brand new itty bitty niece who just came into the world. So very exciting! Finally, I am no longer the only "kid" with kids! A weird thing to be excited about, but it works for me.

I also have a friend who is just about ready to bring her darling boy into the world. She had the coolest shower, which I had to miss to go out of town with my mom and sister to do her wedding dress shopping. Another thing to squee about which I can't get into here because this is a baby post, not a wedding post. Two totally different types of squee-worthy madness.

Anyway, You know how it's now cool to have an activity at your shower instead of games? Or is that only the showers I'm attending? Seriously, crafty is the new mom middle name, because every shower I go to these days has me making a hair bow or some such thing. Well, this shower that I had to miss chose to do the best. freaking. activity. ever. They tie-dyed onesies. HOW COOL IS THAT?! That may be the hippie in me talking, but that is so fantastic. I really wish I could have been there. Ah, regrets.

Even though I missed out on all the fun, of course, I had to make the new mama a baby gift. Baby gifts are so darn happy. I had so much fun with the last baby toy gift I made, I decided to try some new ones.

After much searching and getting sidetracked by pinterest, I found this tutorial from Make It and Love It. It's a soft block and rings. Lily calls the rings a chewy chain. The tutorials are nice and clear with some great pictures. I have been itching to do something in black, white, and yellow. I have seen such cute baby gear in those colors lately.


I added in a crinkle toy because they are so quick and fun. (You can find my post about that tutorial tryout here.) I have started hoarding bits of ribbon from wherever I find it since I started making these crinkle toys. I have a whole ziploc bag full of ribbon bits. Ha.


The block was quick too, until I got to the hand stitching part. I hate hand stitching. It feels like I am cheating on my sewing machine. Plus, I'm no good at it. It took me longer to stitch a one inch whole than it did to sew the whole rest of the block.


I found a genius way to make a rattle at a {day} with lil mama stuart. Take one easter egg, add beads, presto. Instant rattle. Oddly enough, I could find an easter egg, but my bead box had deserted me and so I used pennies. Yup, they were the closest thing I had handy that could make noise. I glued the egg shut so it wouldn't open. So the block makes a rattle sound, but it's surrounded by soft squishy goodness. I stayed up way past bedtime making Sage her own block. She grabs onto it, squeezes it to death and throws it across the room.


The chain was a little more difficult than I anticipated. Trust me, totally worth the effort.


I had a duh moment and sewed a ring shut before I connected it. Try not to do that. Also, keep the rings skinny, you won't be able to sew them shut otherwise. That part is a bit tricky. However, once you're done, you have a washable, chewy toy that is perfect for little hands to hold onto. I'm making one of these for Sagey Poo too.

Instead of a card, I wrote a quick note in a book. Mama and baby will see it each time they read together! Another great pinterest idea. I was going to include a little poem about the gift being handmade, but ran out of time. That's always something to do next time. With three more friends and family who have babies on the way, I'll have lots of practice making toys and gear!


I have linked this post to...
Tip Junkie handmade projectsHome is where the heart is. - Link it up! - Wednesdays - HomesteadSimple.com The Shabby Nest
Going Green with the Grizls

Monday, July 23, 2012

Solid Food Sage Monster, Volume 2


To read Solid Food Sage Monster Volume 1, click here.

So the Saga of Solid Food continues. :) Now if you've met my baby girl, you know she's an eater. It's her favorite thing in the world to do. Since we've started doing solid foods, she's grumpy if people are eating around her and she's not getting any. She's also messy. We gave up trying to feed her in clothes after one shot. I do more loads of bibs than any other laundry. Ha. 

So, in SFSM V.1, I mentioned that we had tried rice cereal. We have since stopped using rice cereal and switched to oatmeal. She was having potty issues, tummy problems, and general crankiness. In searching for the answer, I found info that stated that some pediatricians think that rice cereal is BAD for babies. Apparently, "it's not that different from giving babies a spoonful of sugar." (You can read the article here.) So we waited a few days and tried oatmeal and she loves it. Oatmeal might not be a good idea if there's a history of gluten intolerance in your family, but we're fine there. All of the problems have been alleviated. If you're interested in more info on the rice cereal issue, read this or this or this.

The list of accepted foods is growing. Sage still chomps on sweet potatoes like they're candy. We've also added apples, bananas, avocado, carrots, watermelon, and pears. She wasn't so sure about the avocado alone, but with pears, she loves it. Carrots didn't go over well the first time, but it was an organic jar of food because we were out to Grandma's house. They tasted nasty and bitter. If I wouldn't eat it, I'm not making my baby eat it. 

Luckily, I got my first Bountiful Basket this week and it had carrots so I can make Sagey Poo some yummy fresh food. As a side note, if you don't get bountiful baskets, I require you to immediately click on the link I've kindly provided and participate. 


See this lovely array of fruits and veggies? $15 dollars for all. It's all amazing quality and fresh. It filled up a laundry basket. Bountiful Baskets is a food co-op. You participate by contributing a weekly fee on a Monday and then pick up your produce the following Saturday. Every couple of times, you volunteer and help them sort and what not. Easy peasy. Seriously, go to the website. Learn. Enjoy. You're welcome.

Okay, winding back on topic now....

I've been making baby food like a mad woman this past week. It all started, as good stories often do, when my husband brought me home 9 baked sweet potatoes from his work. I had asked him to bring a "few" home since they throw them out anyway because I wanted to try my hand at making baby food. He brought 9. NINE! So I got out my blender/food processor Bullet thingy, peeled some sweets, and away I went. 


It's a bit of a messy process, but quick enough that in 20 minutes I had two ice cube trays full of pureed sweet potato goodness ready to pop in the freezer. If you're looking for a great set of instructions and pretty pictures, head to Rust & Sunshine's post about it. The picture below is from her blog and gives you an idea of what you'll end up with.

Photo from Rust & Sunshine

Besides sweet potatoes, I have made plums, apples, apples and prunes (dried plums) mixed, peaches, and more sweet potatoes. Tomorrow, I'm all set up to make carrots and peas. I have also spent more hours than I care to admit looking at baby food recipes on Wholesome Baby Food. Since Sage likes her new high chair and will happily watch me while playing with her toys, I can whip up a batch or two pretty quickly.

All together, I have 112 one ounce cubes of baby food prepared. That is over a month of meals for Sage as she usually eats two cubes, twice a day. Overall cost? About 10 dollars. Since the organic jars of baby food run about $.80, I have saved $35.00. Can't beat it. Word to the wise though, use a good sharpie marker to label your bags of food. I had a DUH moment and used a water based marker. Haha. Luckily, I remembered what was what. 

I still had SIX sweet potatoes left to deal with. Honestly, what was the man thinking? I had sweet potato for lunch two days in a row and made a pie. I finally had to admit defeat and throw out the last three. You win sweets, you win.


One last thing, if you don't have one of these nifty food keepers for your baby, get one. Now. I'll wait.

Did you get one? Good.

Sage LOVES when I put one of the frozen cubes of baby food in this. She'll happily gnaw on it until there is nothing left. It's also how we fed her watermelon. Boy howdy, did she like that. She hasn't quite figured out the hand coordination required to hold and eat at the same time, but luckily, she has a patient mama who will hold it for her if need be.

Whew. What a novel. If you made it this far, thanks for reading!!!


Monday, July 2, 2012

Happy house: Febreeze made by me!

So if you are like me, with kids, dogs, and a husband, Febreeze is one of the greatest inventions ever. However, at the rate we go through it, it can get spendy to play Febreeze fairy around the house as often as I would like!

Well that dilemma is now and forever solved!

Homemade Febreeze is the new greatest invention ever. Cheap, easy to make, and the smell is wonderful! I love love love that it is only three ingredients that I already had on hand. I looked at several different recipes before deciding to combine one or two and make my own.

Here's how to make it!


You will need a spray bottle, I used my empty Febreeze spray bottle so I won't get confused by what it is later.

Fill the spray bottle with three cups of hot water.

Add four tablespoons of baking soda. The hot water helps dissolve the soda, so remember to keep it pretty warm.

Finally, add 1/4 cup fabric softener. Shake well, put on your fairy wings, and dance around your house as you make it smell heavenly.

This is enough to fill one regular sized spray bottle, but it is easy enough to double, halve, or make as much as you want. If you have concerns about stains from the baking soda, I have read that white vinegar works just as well. I tested it on several fabrics and so far, no stains. That could just be my love of baking soda talking too.

If you are looking for different scents, it would be easy enough to buy different fabric softener scents, but I love the fresh scent of clean laundry, so the regular fabric softener works for me.
Well, there you have it! Hope you love this stuff as much as I do! Let me know if you try different scents and how it turns out!

I looked at recipes from herehere, and here.

I have linked this post to:


The Shabby Nest  UndertheTableandDreaming
Related Posts Plugin for WordPress, Blogger...